You have completed setting up your Communal site and now it is time to take the next step and launch your site! Walk through these steps to complete your launch
Step 1: Send Communal team your membership data
Before launching you will need to send over your membership data so Communal's product team can import their information in to the system and assign them accounts. You can review our data sample which displays the format we require your data to be in. If you have extra categories for your members data please include those as well.
Once you have compiled the data using the Communal import template please send it to help@getcommunal.com.
Step 2: Develop communications to send to your members
Before you launch your Communal site you your team will need to inform your members about how they can access their new Communal account through your current communication method. This is also a great opportunity to re-engage with past members and encourage them to make a purchase again!
Many organizations use the template below as a starting point to craft their message. Remember to update the bolded areas with your correct information.
Membership Welcome Email Template:
Hi XXXX,
We've transitioned our memberships to a new location where you can now actively manage your account, access your membership card, and sign-up for automatic renewals. Going forward, we'll be transitioning <<program registration/volunteer registration/facility rentals/donations/further communications etc>> to this site as well.
Current members, an account was created in reference to your email address. You'll need to follow the instructions below to reset your password. Once you're in, we encourage you to update your profile for future communications:
- Go to the following URL:<<YOUR_ORGANIZATION_URL>>.getcommunal.com/password/reset
- Enter your email and select "Send Password Reset Link"
- Go to your email account and find the message from the <<ORGANIZATION NAME>> "Reset Your Password"
- Follow the link in the email to enter your new password
You now have access to your account where you can purchase memberships and engage in other community activities.
Step 3: Put Communal Links on your website
Additionally, we would very much appreciate you putting a link to our site in the footer of your website. Something as simple as "Nonprofit Management Tools Powered by Communal" with a link to our website. When you put our link on your website it also means that if someone finds us and becomes a client using your link you will receive a discount on your subscription!
Got questions? Feel free to email help@getcomunal.com for support.
Step 4: Turn on notifications
Once your membership data has been imported and you sent out your communication to your members it's time to turn on notifications so that your users can begin receiving information about their membership renewals and expiration. To do so, follow the steps below:
- First, you will navigate to your Manager Dashboard and on the left-hand menu select Membership Types
- Then select your membership type Name and click on the three dots under Actions to edit the settings
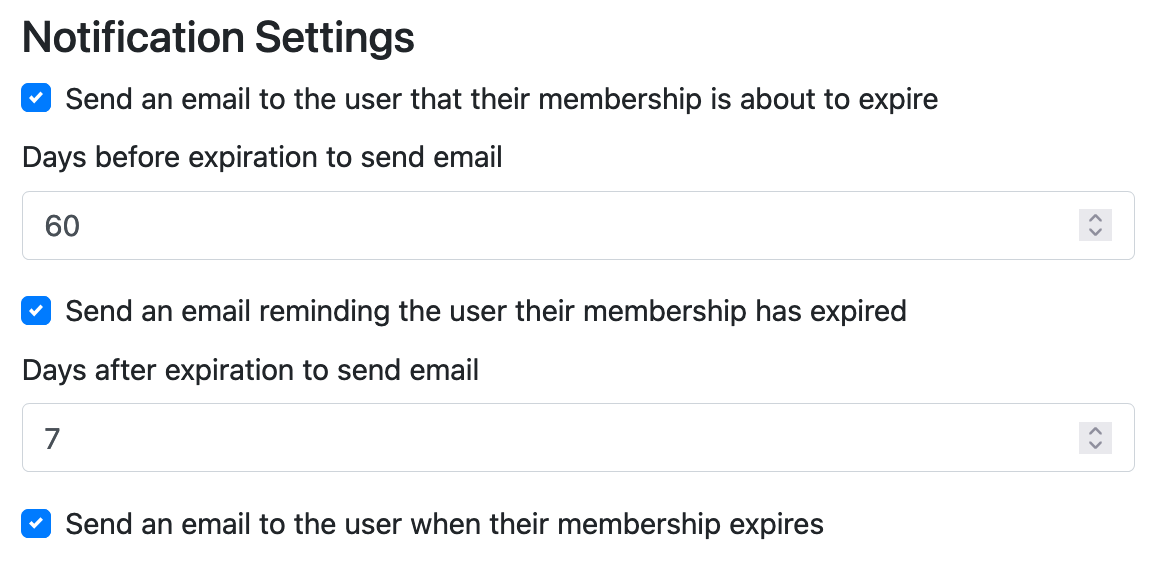
- Then scroll down to the Notification Settings and select your desired settings. Most of our organizations choose the structure shown below:

- Then, scroll to the bottom of the page and hit Save
